Important Announcement
Title, thumbnail ya video me agar abusing, adult ya sexually explicit content paya gaya to channel bina kisi warning ke permanent delete kar diya jayega. Yeh rule turant lagu hai. Ab tak 350+ channels delete kiye ja chuke hain. Kripya kisi bhi prakar ka adult ya abusive content upload na karein. Rule violate hone par channel bina bataye delete ho jayega.
— Team ApnaTube
শর্টস সৃষ্টি
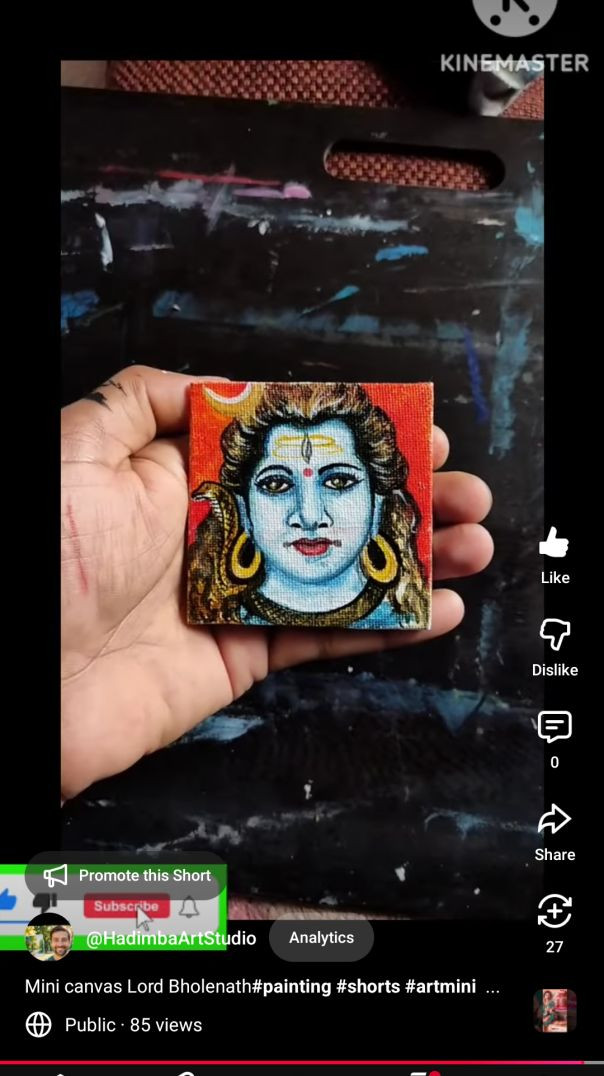
Welcome back to Hadima Art Studio! Prepare to be amazed by the subtle complexity and boundless potential hidden right at your fingertips.
This isn't just a simple craft; it's an exploration of the stunning patterns that make you, you. In this long-form tutorial, we meticulously guide you through the process of using fingerprints—the most intricate texture Nature has ever designed—to create breathtaking and soulful works of art. We’ll cover everything from choosing the right ink and paper to adding delicate details that bring your fingerprint masterpieces to life.
Witness the transformation as a simple press of the finger becomes a bird in flight, a bouquet of flowers, or a captivating abstract galaxy. It’s an incredibly therapeutic and rewarding artistic process that results in art that is deeply meaningful.
Your support means the world to us and allows us to keep bringing you fresh, beautiful, and unique art ideas!
To join the Hadima Art Family:
WATCH the entire video for all the tips and tricks!
GIVE this video a THUMBS UP! Your 'like' is a vote of confidence that helps YouTube share our passion with more aspiring artists.
CLICK the SUBSCRIBE button for Hadima Art Studio and make sure that little notification bell is switched ON! Every new subscriber BOOSTS our channel and empowers us to create even better content for you.
Visit our channel homepage for our full library of unique art projects!
We are so grateful for your support! Let your creativity leave a lasting impression!
#artstudio #fingerprintdrawing #creativetherapy #hadimaart #artinspiration #personalizedgifts #howtoart #boostmychannel

4
0
2
16

PRADEEP KUMAR PKKK GAMING
MY SECOND YOUTUBE CHANNEL SUBSCRIBE ALL FRIENDS LINK👇
Name. SKKK GAMING
https://youtube.com/channel/UC....wI40LlxqkWBkOVyPKP2g
INSTRAGRAM. LINK 👉 https://www.instagram.com/pradeep_kumar_pkkk_gam
TWITTER LINK.
https://twitter.com/PkkkKumar?s=09
FACEBOOK LINK. https://www.facebook.com/profi....le.php?id=1000281639
MOJ ACCOUNT LINK. https://mojapp.in/@pradeepkumarpkkkgaming
THANK FOR WATCHING
PLEASE SUBSCRIBE ALL FRIENDS FOLLOW GYS
Tile work involves preparing the surface, laying out the tile pattern, mixing adhesive, cutting tiles as needed, adhering tiles to the prepared surface, and then applying grout to the joints. Key steps include proper sub-surface preparation, using spacers for uniform joints, ensuring the tiles are level, allowing the adhesive to cure, cleaning the tiles during installation, and then grouting and cleaning the joints.
This video demonstrates the process of laying floor tiles, including checking for level and alignment:
Surface Preparation
Clean and level the surface: Ensure the subfloor or wall surface is clean, dry, smooth, and structurally sound.
Prepare the substrate: For floors, this may involve cleaning existing concrete or preparing a suitable base. For walls, ensure plasterwork is complete and waterproof where necessary.
Waterproofing: If tiling an area exposed to water (like a bathroom), apply a waterproofing layer.
2. Layout and Dry Lay
Mark layout lines: Establish center lines for your layout using a spirit level or laser level to guide the tile placement.
Dry lay: Lay out tiles on the surface without adhesive to visualize the pattern, assess cuts, and make adjustments to the layout for better results.
3. Mixing and Applying Adhesive
Mix adhesive/mortar: If using a traditional method, mix cement and sand with water to create a honey-like consistency mortar.
Apply adhesive: Spread the adhesive evenly on the prepared surface using a notched trowel.
4. Setting the Tiles
Place tiles: Begin placing tiles along the layout lines, pressing them gently into the adhesive with a rubber or wooden mallet to ensure even adhesion and a level surface.
Use spacers: Insert tile spacers to maintain uniform spacing and straightness of the horizontal and vertical joints.
Cut tiles: Use a diamond or wet saw to cut tiles as needed for edges and corners, ensuring clean and accurate cuts.
You can watch this video to learn the basics of tiling a wall, including using tools like a trowel and placing tiles:
5. Grouting and Cleaning
Allow adhesive to cure: Let the adhesive cure completely for the time recommended by the manufacturer.
Apply grout: Once cured, clean the joints and apply grout using a grout float or sponge, forcing it into the gaps.
Clean excess grout: Wipe off excess grout with a damp sponge before it sets, and polish the tiles with a dry cloth to a clean, blemish-free finish.
6. Final Steps
Curing: Allow the tiled area to remain undisturbed for at least 24-48 hours for proper bonding.
Clean the area: Thoroughly clean the completed tiled surface.
Thank you for all family members

1
0
2
7

#melodiousvoice #singingstars #popularsong #englishsongs #devotionalsinger #vyrloriginals #specialsongs #spiritualsinger #patrioticsongsTor Javani Lago Aroplane Ge 🔥 trending 🔥 Bhojpuri Song #bhojpuri #shorts #viralsong #gunjan Lalten

0
0
1
4

He shows that effort isn_t about how much you can do

2
0
7
11

animal move

4
0
6
20

Love

1
0
9
6
